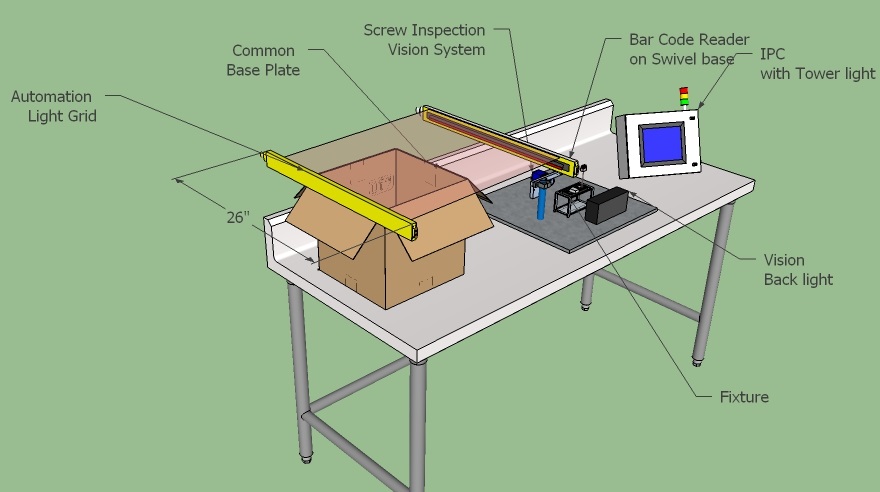
Custom Designed Automated Vision Inspection and Data Logging System for the Automotive Manufacturing Industry

One part of the assembly process requires installing screws to specified torque requirements, the next stage is an automated vision based part inspection that checks to make sure the system is assembled correctly. Both the torque data and the vision image are logged to permanent files.
If the torque reading does not fall within tolerance or the vision inspection testing fails the part is not allowed to be packaged and an alarm will sound if an attempt is made to package failed parts.
Project Description
This automated Quality system reads and logs; 2D datamatrix codes, torque values and vision inspection pass/fail criteria.
Capabilities Applied/Processes
Station Design
- Create custom application software to preform logic and logging functions
- Create SolidWorks 3D Models of Station Concept
- Vision and lighting application concept and testing
Installation
Start-Up
Operator and Maintenance training
Features/Benefits
Features
Utilizes SICK© Inspector camera and SICK© Lector 2D reader
A PRODFACE© Industrial PC / HMI is used for operator interface, data logging and logic control
Portable Cell
Provides visual and audible feedback on each part inspected.
Benefits
By utilizing this custom quality control station the customer was able to meet their customers’ quality control standards.
This system virtually eliminates the possibility of shipping incomplete and / or incorrectly assembled parts.
Easily modified to meet new product requirements.
More Info
Overall Cell Dimensions
Table top unit: 36″ High x 48″ Wide x 24″ Deep
Pattern Size Capabilities
1.5″ High x 4″ Wide
Tightest Tolerances
0.05 inch
Material Used
None
In Process Testing Performed
Samples of all models were provided for initial concept testing
Industry for Use
Automotive
Delivery Location
Ohio
Standards Met
Customer supplied quality requirements
Product Name
Automated Vision Inspection and Data Logging System
